Summary. Communicating with smaller groups of people can be done using standard email services (Gmail, Hotmail, Yahoo) and, if you desire, additional software can be used (Thunderbird, Outlook, Apple Mail). Most of these have a “group” capability in their address book or contacts list, and they allow for sending a single email to a few dozen people. However, with larger lists, it’s necessary to use an email distribution system or service for the reasons mentioned below. This document describes why you’ll want to use MailChimp, and describes how it works. Effective email distribution is a little bit complicated to get setup. This is why you may want to have assistance from someone skilled with the process. Contact us if you need additional help.
Overview. Before you get intimidated, here’s a simple overview of how MailChimp and other email distribution systems work.
- Setup a mailing list. An existing list can be imported, or you can start from scratch.
- Create a message or newsletter to send people (this is called a “campaign” in MailChimp).
- Send your message.
That’s all there is to it. The rest of this document describes the above process in more detail, and also explains why email distribution systems are necessary. The instructions here are specific to MailChimp, but apply to just about any service. The screen images used here are current as of June 2013 after a redesign to the MailChimp system. However, they may not be accurate a year from now. So, it’s important to focus on learning the general process and develop the intuitive skills required.
Problems With Group Mailings. As you approach 30 or more recipients for a single email, several problems can arise if you try to send that message using traditional email methods.
- Your email service provider may suspect you of sending SPAM (unsolicited junk emails) and this could result in your account getting shut down or temporarily frozen.
- When people receive an email with a long list of recipients, they are less likely to consider it personally relevant to them. It will be perceived as impersonal and likely to be junk mail.
- Messages with large numbers of recipients are perceived by Junk Mail Filtering systems to be SPAM. So, your message may be blocked and the recipients may not receive it.
- Managing a list can be time consuming. People frequently change their email addresses. People who are in your list want off. Others want to be added. Delays and typos create further problems.
Benefits of Email List Services. Email distribution systems resolve all of the above problems, and offer additional benefits. For example, some can tell you how many people read your email message. Also, your messages can be formatted to be more attractive.
Email List Service Options. There are several ways to communicate with groups of people. For an example, see the Iowa City Scrabble Club subscribe page. On that page you’ll see the following five methods used. They are described here briefly.
- MailChimp. An email subscription system that allows the use of existing lists, and also provides a signup form for new subscription requests. Messages are composed and sent from within your MailChimp account. The drag and drop interface makes it easy to create a fancy newsletter. The service is free for those with smaller lists who send out fewer messages weekly or monthly. The paid MailChimp service levels are similar to those offered by CreateSend.ie or Constant Contact.
- Facebook. Having a Facebook page is one way to reach people. However, there’s no guarantee that they will see your message unless they visit your page, or happen to be on Facebook when you post an announcement.
- Twitter. Like Facebook, Twitter isn’t a reliable way to communicate with people. Since people may be reading through many Tweats that scroll by on their news feed, they may miss your postings.
- Yahoo Groups. Similar to MailChimp, Yahoo Groups lets you import an existing list of email addresses (up to 100 per day). There are also additional collaborative tools.
- WordPress.com Subscription. This option lets you email website posts by email. Since all posts are distributed, it may be best to setup a dedicated WordPress.com subscription website for monthly newsletters (for example). However, it’s not necessary. If your website followers are sufficiently interested, they will appreciate getting all posts in real-time.
What MailChimp Does. MailChimp is really several services in one: (1) mailing list manager, (2) email composer, (3) email sender. It’s logical to have all these combined in one service. Yet, in the past, it was common for a person to manage their email list in a spreadsheet, create their newsletter using Publisher, and send it using an email service provider. That was a lot of work. Having all of these functions in one place makes things easier.
Mailing List and MailChimp. For most mailing list needs, a single mailing list will be imported or started from scratch. The ongoing maintenance of the list will be done automatically through signup/subscribe forms and unsubscribe requests.
- To get started, once logged into MailChimp, you’ll create a list for the first time. Skip this step if someone has already done it for you. Otherwise, go to step #2.
- Go to Lists and click on Create List. When you create your list, you’ll be asked to give it a name and you’ll provide other default information for use later when sending.
- Note: Unless you’re managing multiple lists for multiple groups, you’ll probably just have one list. In fact, it’s probably best to have separate MailChimp user accounts for different lists, since the free MailChimp service restricts the size of lists to 2000 people or less and the number of mailings are also limited. This also makes it possible to delegate the work of a certain list to another person (although multiple user accounts are also available).
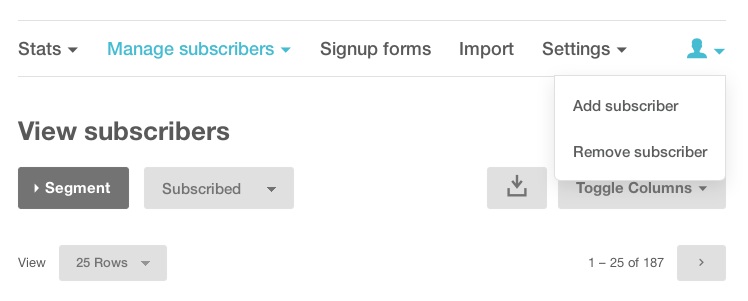
- After creating your (initially empty) list, you can begin to add email addresses to it either by importing or adding one at a time. From the Lists page, click on your list to see the management options. In the upper right corner, you’ll see a silhouette of a person. Hover your mouse to reveal the Add Subscriber option as shown below. Click here or the image for a larger view.
Once you click Add Subscriber, you’ll get a form like the one shown below. You can use this form to enter people one at a time.

If you have an existing list, import the list from your computer. Go to the main Lists page, click on the List name, click Import, and follow the instructions.
Letting People Subscribe. Most lists are built over time when people Subscribe to your list (called opt-in). You can send people to a subscription page for your MailChimp mailing list by following these steps:
- Go to the main MailChimp Dashboard.
- Select Lists.
- Click on the list name.
- Click on Signup Forms
- Click on Link to a Form
- Customize, or just click Click Share It
- Copy the short URL that will send people to your form. It should begin with http://eepurl.com/
- When people go to that link, they will be able to signup for your list. You can send that link out by email and even share it on a website.
Creating a Newsletter or Email. Follow these steps to create a newsletter or email.
- Go to the main MailChimp Dashboard
- Click on Campaigns (these are like newsletters)
- If you’ve had a previous campaign similar to what you want to create now, then from the drop-down arrow/triangle on the right, choose replicate. Otherwise, click on Create Campaign.
- Choose who the message will go out to. Usually it’s your entire list.
- Give the campaign a name. You might consider using YYYYMMDD-name as a format. So, a newsletter being sent on June 24, 2013 would be called 20130613-newsletter. Fill out or customize any of the other settings as needed then click Next.
- Choose a Template. Drag & Drop editor works well, so choose that.
- Select a Template by clicking on Basic Templates. Select One Column.
- Fill out all areas of the initial sample template. In the upper right corner, you’ll see “Use this area to offer a short preview of your email’s content.” Click on that text to put a custom message or link (like a link to your Facebook page).
- You can click and drag any element from the right to your newsletter on the left. Click on any existing placed element to edit it.
- Click Next. A text only message will be created from what you designed above. If you’ve replicated a previous campaign, the previous text message will be here, so be sure to update it by clicking on Copy Text From HTML Email.
- Click Next and review all of your choices and selections.
- At the top of the page, under Preview & Test, you’ll find an option to Send a Test Email. Choose this option to make sure your email will look okay.
- View your message (the test message) on a desktop/notebook computer as well as other devices like a tablet/iPad and smartphone/iPhone.
- Once you’ve confirmed everything is okay, click Send Now.
The above steps are detailed and may look a bit intimidating. However, once you’ve done this a few times, you’ll see that it’s simply a matter of replicating and then modifying previous campaigns. So, sending a simple newsletter can be almost as easy as sending a normal email.
Contact us if you have a suggestion for how the above instructions can be made clearer.


